
Regular cooking with oils and fats is a great way to build up the seasoning on your AUS-ION wrought iron pan. The seasoning (also called the patina) forms when oils and fats bake onto the pan’s surface through a process known as polymerisation. Seasoning adds a natural, non-stick surface to your pan to enhance your cooking and protect it from rust. Unlike traditional non-stick cookware, your pan contains no coatings and becomes non-stick over time as the patina develops. This is a healthy, forever renewable feature of our cookware, allowing you to avoid harmful chemicals like PFAS.
While our AUS-ION pans come pre-seasoned with non-GMO oil to help you get started, cooking with oils and fats is the best way to establish a solid seasoning base right from the get-go! The more you cook, the better your seasoning becomes, which will reduce the need for oil and improve the surface of your pan over time.
If you're new to seasoning, we've put together some simple recipes and cooking methods to help you keep building up your seasoning to ensure your pan is ready for lifetimes of cooking.
Pro Tip: Mastering non-stick cooking with iron is all about good heat and fat management! Our non-toxic cookware is highly conductive. Remember to lower your heat—medium is your new high! Preheat on low to medium heat to protect the seasoning. (Once the pan is warm, add oil, let it heat up, and you're ready to start cooking).
.jpg)
.jpg)
One of the easiest ways to start building your pan’s seasoning is by cooking healthy veggies with a dash of oil! Use whatever veggies you have on hand.
Our pans work on all heat sources, so you can start cooking on the stovetop and finish by roasting in the oven for added convenience and a crispy finish.
For the best results, ensure even cooking by selecting veggies that have similar cooking times and cutting them into uniform pieces. For example, broccoli and cauliflower roast at about the same rate, making them perfect partners in the pan.
Avoid overcrowding the pan for even cooking. When sautéing, add vegetables in stages, starting with those that take longer to cook, like carrots and onions. (In fact: caramelising onions is a simple and effective method for getting to know your pan while adding wholesome flavour).
How to Cook:
Heat your pan gradually on low to medium heat.
Once warm, add your oil and toss to coat the veggies.
Cook until they’re soft or roasted to your liking.
Season with salt and pepper to taste, and enjoy!
Tip: Avoid cooking wet or acidic foods, like tomatoes or vinegar, until your seasoning is more developed. These foods can break down your seasoning and affect your pan's natural, non-stick properties.
Recipe idea: Give this tasty, veggie filled: Sweet Potato Gnocchi dish a go!
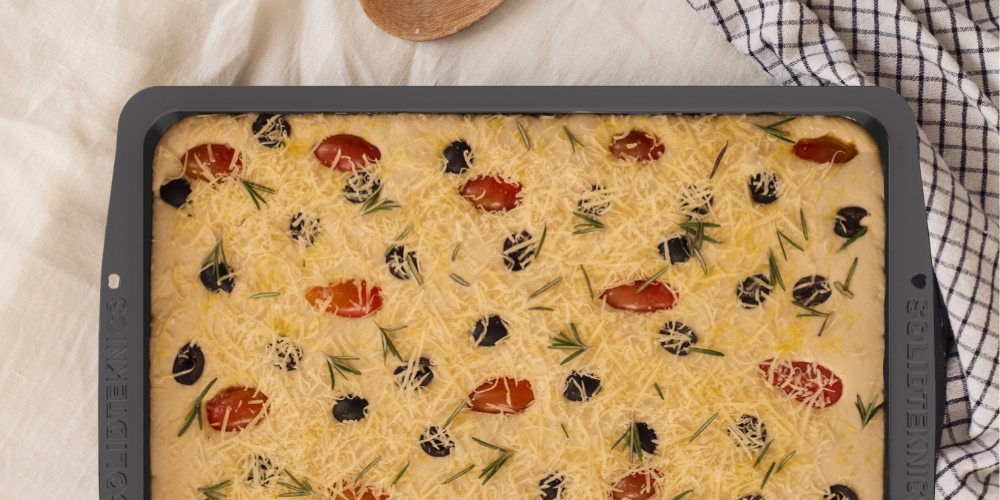
You can enjoy baking a range of delicious breads, all while improving your pan's seasoning or natural, non-stick properties. Our frypans are highly conductive, making them an excellent choice for baking bread with crispy crusts that are moist inside and full of flavour.
Recipes like focaccia and cornbread are fantastic for helping your iron pan's seasoning develop due to the high oil or fat content (a significant amount of olive oil in focaccia and a large amount of butter in cornbread).
These oils/ fats envelope your pan as you bake and help boost the seasoning. They're also delicious dishes to try, so your taste buds will benefit also.
Recipe idea: Try this incredible Potato, Rosemary, and Garlic Oil Focaccia—it's packed with flavour and will help nurture your patina!
.jpg)
To enhance your seasoning, you can shallow fry or deep fry a variety of foods in your iron pans. The possibilities are endless—tempura veggies, southern fried chicken, schnitzel, vegan nuggets, and so much more! These dishes help give your pan a "seasoning bath" by coating the pan's surface with oil. As the oil heats, it polymerizes, forming a durable, protective layer that improves your pan.
Safety Note:
Always take safety precautions when deep frying or working with hot oil, as oil at high temperatures can spit and cause burns. Heat your pan gradually and handle it carefully—our pans are highly conductive, so they heat up quickly! For added precision (especially if you're still learning about heat and fat management with iron), consider using a high-temperature thermometer to ensure accuracy and avoid overheating.
Tips for Frying:
1. Preheat the Pan Slowly: Heat your iron pan on low to medium heat before adding oil. Preheating helps the pan warm evenly, preventing thermal shock. Once the pan is warm, add your oil and let that heat up gradually.
2. Maintain the Right Temperature:The oil should be hot enough to sizzle when food is added but not smoking. A simple test: drop a small piece of bread into the oil—if it browns in about 60 seconds, the oil is ready. For greater accuracy, use a high-temperature thermometer.
3. Use the Right Oil: Choose oils with a high smoke point, such as rice bran, canola, vegetable, or sunflower oil. Avoid olive oil for shallow frying, as it has a lower smoke point and may burn or leave fried foods with an unpleasant taste at higher temperatures.
4. Oil Depth for Frying
Shallow Frying: Use enough oil to cover the food halfway. This allows the food to get crispy on all sides without fully submerging it—perfect for items like chicken tenders, schnitzels, or tempura.
Deep Frying: Ensure there’s enough oil to fully submerge the food. This promotes even cooking and gives the food room to float, resulting in a crispier finish.
5. Don't Overcrowd the Pan: Whether shallow or deep frying, avoid overcrowding the pan. Adding too much food at once can cause the oil temperature to drop, leading to soggy food. Fry in batches for the best results.
6. Drain Food After Frying: For optimal results, use one of our efficient stainless steel or titanium Kitchen Tools to drain excess oil quickly, or place the food on a paper towel-lined plate to absorb excess oil.
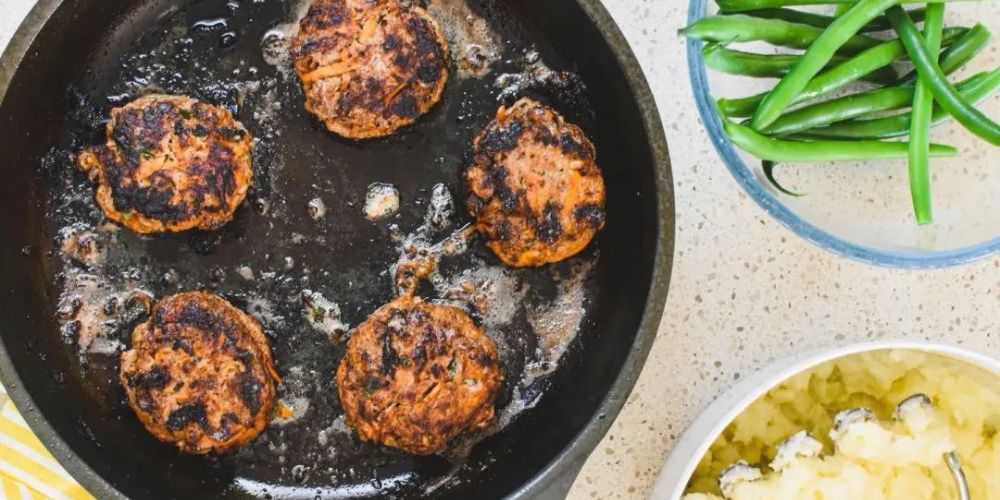
Minced meats like beef, pork, or chicken are perfect for building up seasoning. These meats release fats that coat the pan and help with the seasoning process. Our AUS-ION pans are ideal for searing and grilling burger patties or rissoles.
Recipe idea: Try this simple and delicious Aussie Rissole Recipe—it's easy to make and sure to be a hit with everyone, even the kids!
Tip: Want to speed up the cooking process and ensure your burger patties and rissoles are evenly cooked while retaining an exceptional charring, bursting with flavour? Check out our new Protein Press and Grill Pans, which are available to back now on Kickstarter!
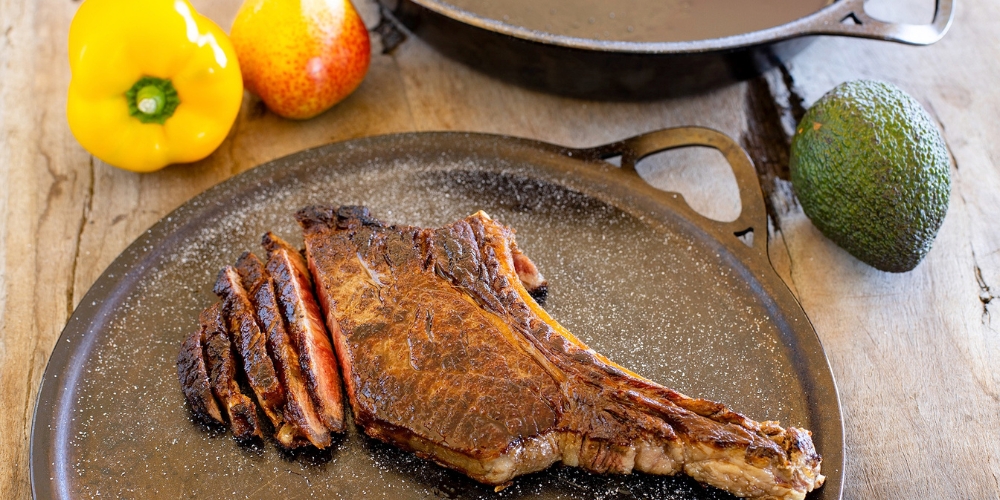
Once you’ve mastered the cooking methods and recipes above, it’s time to start frying, grilling, and searing steaks in your iron pan—something they excel at. Frying meat in your new pan with a little oil is a great way to continue building your seasoning while adding rich flavors to your cooking surface.
Note: If your seasoning is new, you may notice patchiness initally when frying steaks, as the pan sears/roasts in a mostly stationary position. This is completely normal! It’s not about how the pan looks—it’s about how it performs. Over time, with regular use, the seasoning will even out and improve.
Preheat the Pan Properly
Always allow your pan and oil enough time to heat up. Skipping this step can cause food to stick. Many cooks, used to synthetic non-stick pans, cook at too low a heat, which results in meat stewing instead of searing. Since our pans are highly conductive, you don’t need high heat—just some patience! A hot pan helps create a nice sear, locks in juices, and form a flavorful crust.
Match Pan Size to Burner Size
For the best results, choose a pan that closely matches your burner size. Using a large pan on a small burner (especially with induction cooking) can concentrate heat in the center and risk warping the pan.
Bring Meat to Room Temperature
Meat sticks when it's too cold, or the pan isn't hot enough to form a crust. Always bring your meat to room temperature before cooking and preheat the pan properly.
Preheat Your Pan Slowly: Start heating your pan on low to medium heat and add in your oil once the pan is warm.
Wait Until Your Pan is Hot Before Adding the Meat: A simple way to check if your pan is hot enough is to hover your hand a several inches above the pan (about 10cm) — if you can feel the heat, it’s ready to start cooking! Once the pan is hot enough, the pan will sizzle when the meat hits it.
Avoid Overcrowding: This can reduce even heat distribution and cause the meat to steam rather than sear. If cooking multiple steaks, do it in batches.
Let the Meat Form a Crust Before Flipping: If the meat is stuck to the pan, it’s not ready to move yet! Use tongs to gently jiggle the meat. If it moves well, it’s ready to flip. If not, leave it in place a bit longer.
Cook to Your Preferred Doneness: For medium-rare, flip the steak after about 4-5 minutes and cook the other side to your liking. Adjust cooking time for thicker or thinner cuts. Alternatively, use a meat thermometer to check for doneness.
Optional: After cooking, some people like to let their steak rest for 5-10 minutes. This allows the juices to redistribute, keeping the steak juicy and tender.
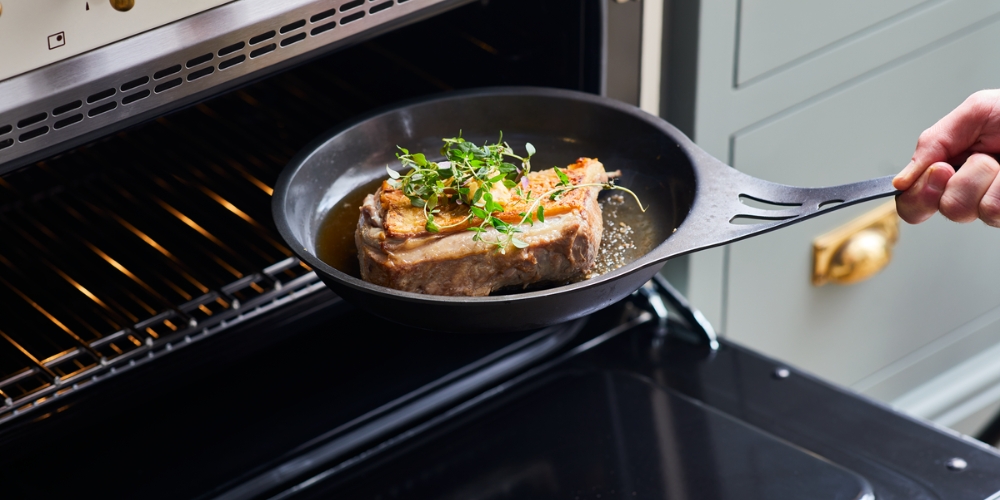
If your steak is on the thicker side, you can also opt to transfer the pan to a preheated oven after searing to finish cooking it to your liking.
.jpg)
Cooking regularly with fats and oils is the easiest way to build a durable patina on your AUS-ION pan. If your pan needs more help you can also use our stove top or oven seasoning method. The appearance of your pan will continue to evolve depending on what and how you cook. It won't be dark and shiny all at once, and patchiness is very normal as your pan's seasoning continues to develop.
The best part? With iron, the more you cook, the better the seasoning gets—transforming your pan into a kitchen essential that improves with every meal. So, start cooking today, watch your AUS-ION pan's natural non-stick properties evolve, and serve you for generations.
Discover the benefits of cooking with non-Teflon cookware today! Choose our seasoned iron pans, proudly made in Australia from clean, locally sourced iron. With no synthetic coatings and free from harmful PFAS, you can cook confidently, knowing you're getting superior results and a healthier cooking experience the whole family can enjoy.
Copyright © 2025 SOLIDTEKNICS PTY LTD. All Rights Reserved
ABN: 17600300481. E-commerce software by Neto
In the spirit of reconciliation Solidteknics acknowledges the Traditional Custodians of country throughout Australia and their connections to land, sea and community. We pay our respect to their Elders past and present and extend that respect to all Aboriginal and Torres Strait Islander peoples today.